
If you are running the PAP2t with a tomato firmware router, this may represent a persistent issue after
rebooting the device, generally it won't register back as usual, in order to fix this you only need to set
Tomato UDP Unreplied timeout down to 10 (from default of 30).
Configuration Details
Step 1
The first step is to find out what IP Address your adapter is currently using. To do this, pick a phone connected on Line 1 and do the following:
Dial: **** (That is 4 asterisks)
Once this is done, dial: 110# (110 followed by a square)
The system should now playback the IP Address your device has been assigned.
(Example: 192.168.1.2)
Step 2
Using your favorite web browser from a computer on the same network, point the address to the IP address of your adapter.
(example http://192.168.1.2) Replace 192.168.1.2 by the IP Address your device is currently using.
Step 3
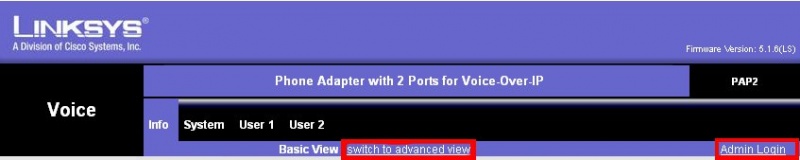
You should now see the web interface of your Linksys/Sipura.
At the top of the page below the tabs, click on the link "Admin", and once the page has reloaded, click again on the link "Advanced View".
Step 4
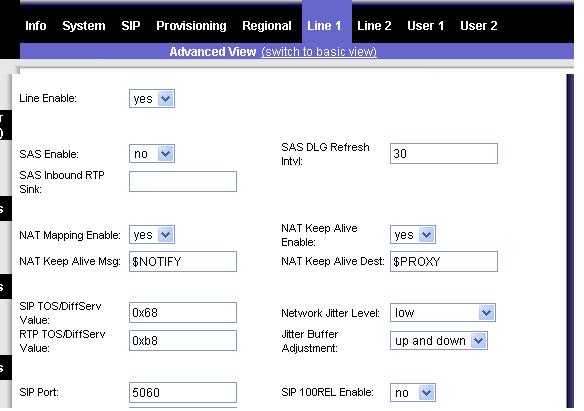
Under the LINE 1 Tab, Find the following fields and fill them with the following information
Nat Keep Alive: Yes
Nat Mapping/Traversal: Yes
Proxy: atlanta.icttech.net (You can choose any of our multiple icttech.net servers)
Register Expires: 180
Proxy Fallback Intvl: 180
Display Name: John Smith (Replace with your name or company name)
User ID: 100000 (Replace with your icttech.net username)
Password: ******** (Type in the account password)
Use DNS SRV: NO
DNS SRV Auto Prefix: NO
Step 5
You can configure your adapter with a better dial plan, allowing faster dialing of 10 digits number (Local US/Canada) and also enable 7 digits dialing in one area code of your choice.
At the bottom of Line 1 TAB, you will find a field called Dial Plan
Replace the 555 digits in the following line by the area code of your choice and copy the line, including parenthesis, in the Dialplan field in Line 1 Tab at the bottom of the page:
(911S0|310xxxx|<:1555>[2-9]xxxxxx|1[2-9]xx[2-9]xxxxxxS0|[2-9]xx[2-9]xxxxxxS0|*xx|***xxx|*xx.|[3468]11|822|0|00|4xxx|**275*x.|xxxxxxxxxxxx.)
Click here for more information on Linksys dial plans
Step 6
Click on the "Save Settings " button at the bottom of the form.
Configuration Screens

Customer Submitted Information:
For North America:
Found this link on configuring the PAP2-NA hardware to work better in North America and specifically with icttech.net.
Read the article called: Configure your Linksys VoIP ATA the right way!
To upgrade a firmware version from a Windows system, the PAP2T-NA documentation nor Cisco's web site does not say how to do this. Go to Cisco PAP2T Internet Phone Adapter with 2 VoIP Ports. Click on the link "Download Firmware", which downloads the .zip file. Run the .exe file, then enter the IP number of the ATA device (called “SPA” in the program). It then upgrades the device. This is provided for your information: the author is not saying you have to upgrade the firmware.
How to avoid the long delay to hear the ringtone
If you ever experience some delay to hear the ringtone when you make outgoing calls with your PAP2T. Changing the PAP2T's Interdigit Long Timer value can help resolve the issue. Follow the next steps in order to change that setting:
Note: However before changing that option, test if calling the number with an # at the end of the number works(e.g. 5554441234#).
      If that doesn't work you need to contact the support staff in icttech.net.
- 1- First access the PAP2T's web interface.
- 2- Click on the Admin Login and then click on (switch to advanced view)
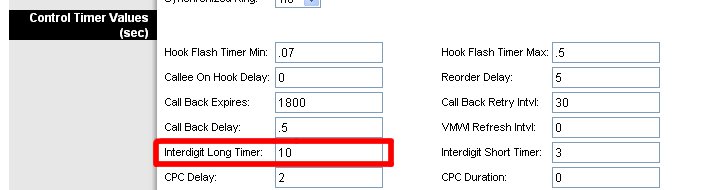
- 3- Click on the Regional tab and look for the Control Timer Values (sec) section.

- 4- Enter the desire value in the Interdigit Long Timer field (for example lower this value to 4).
Phone will not ring on handset
Sometimes the Phone you are using is designed for a certain Voltage and Ring Waveform. If someone tries to call you and the phone appears to be ringing for the caller but your phone never rings please follow these steps to hopefully resolve this issue for you.
Step 1: First access the PAP2's web interface.
Step 2: Click on the Admin Login and then click on (switch to advanced view)
Step 3: Click on your Regional Tab on the Top Menu.
Step 4: Go Halfway Down the Page until you see the Heading Ring and Call Waiting Tone Spec
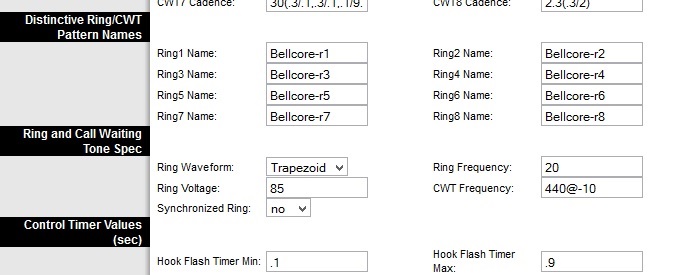
Step 5: Change the Ring Waveform setting to Sinusoid or Trapezoid, the opposite of what you have set. You can also change the Ring Voltage in increments of 5 to 90 or 95.
Step 6: Save Settings and Test an Incoming Call
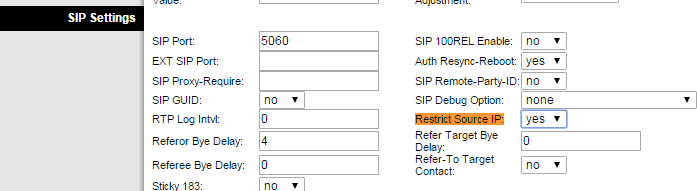
Receiving Unwanted Calls in the middle of the Night ( i.e. CallerID 100) that do not appear in your CDR:
These calls are not going through our Network but rather through the internet directly to your ATA Device.
Please look under the Voice>> Line 1 page in your Linksys device for the following setting: Restrict Source IP and make sure it's enabled.
This way the ATA device will block any traffic not coming from our servers.
Linksys PAP2T ATA Adapter Reset Procedure
Sometimes it will be very helpful to reset your linksys ATA adapter to factory default settings.
- Connect a telephone to line 1 of the PAP2T unit and power it on.
- Disconnect your PAP2T adapter from the internet connection(unplug the Ethernet cable from the PAP2T hardware unit). Resetting with internet connection may mess up the unit making it completely useless.
- Dial ****, and wait for the Interactive Voice Menu (IVM) to get activated.
- Type in the following number including the # symbol.
73738#
(This number spells RESET.)
- Confirm this by pressing 1.
Your linksys ATA unit will now go back to it factory default settings.
Note: There are some PAP2/PAP2T devices in circulation which were originally 'locked' to one provider and subsequently unlocked by end users. Do *not* use the RESET$ command with these boxes.
See also
- Dial Plan for Linksys ATAs
- You can check the most commonly used Star Codes from Cisco/Linksys Star Codes
SPA Star Codes
- *69 Call Return Code
This code calls the last caller.
- *07 Call Redial Code
Redials the last number called. (Not in pap2t)
- *98 Blind Transfer Code
Begins a blind transfer of the current call to the extension specified after the activation code.
- *66 Call Back Act Code
Starts a callback when the last outbound call is not busy.
- *86 Call Back Deact Code
Cancels a callback.
- *05 Call Back Busy Act Code
Starts a callback when the last outbound call is busy. (Not in pap2t)
- *72 Cfwd All Act Code
Forwards all calls to the extension specified after the activation code.
- *73 Cfwd All Deact Code
Cancels call forwarding of all calls.
- *90 Cfwd Busy Act Code
Forwards busy calls to the extension specified after the activation code.
- *91 Cfwd Busy Deact Code
Cancels call forwarding of busy calls.
- *92 Cfwd No Ans Act Code
Forwards no-answer calls to the extension specified after the activation code.
- *93 Cfwd No Ans Deact Code
Cancels call forwarding of no-answer calls.
- *63 Cfwd Last Act Code
Forwards the last inbound or outbound calls to the extension specified after the activation code.
- *83 Cfwd Last Deact Code
Cancels call forwarding of the last inbound or outbound calls.
- *60 Block Last Act Code
Blocks the last inbound call.
- *80 Block Last Deact Code
Cancels blocking of the last inbound call.
- *64 Accept Last Act Code
Accepts the last outbound call. It lets the call ring through when do not disturb or call forwarding of all calls are enabled.
- *84 Accept Last Deact Code
Cancels the code to accept the last outbound call.
- *56 CW Act Code
Enables call waiting on all calls.
- *57 CW Deact Code
Disables call waiting on all calls.
- *71 CW Per Call Act Code
Enables call waiting for the next call.
- *70 CW Per Call Deact Code
Disables call waiting for the next call.
- *67 Block CID Act Code
Blocks caller ID on all outbound calls.
- *68 Block CID Deact Code
Removes caller ID blocking on all outbound calls.
- *81 Block CID Per Call Act Code
Blocks caller ID on the next outbound call.
- *82 Block CID Per Call Deact Code
Removes caller ID blocking on the next inbound call.
- *77 Block ANC Act Code
Blocks all anonymous calls.
- *87 Block ANC Deact Code
Removes blocking of all anonymous calls.
- *78 DND Act Code
Enables the do not disturb feature.
- *79 DND Deact Code
Disables the do not disturb feature.
- *65 CID Act Code
Enables caller ID generation.
- *85 CID Deact Code
Disables caller ID generation.
- *25 CWCID Act Code
Enables call waiting, caller ID generation.
- *45 CWCID Deact Code
Disables call waiting, caller ID generation.
- *26 Dist Ring Act Code
Enables the distinctive ringing feature.
- *46 Dist Ring Deact Code
Disables the distinctive ringing feature. The default is *46.
- *74 Speed Dial Act Code
Assigns a speed dial number.
- *16 Secure All Call Act Code
Makes all outbound calls secure.
- *17 Secure No Call Act Code
Makes all outbound calls not secure.
- *18 Secure One Call Act Code
Makes the next outbound call secure. (It is redundant if all outbound calls are secure by default.)
- *19 Secure One Call Deact Code
Secure One Call Deact Code Makes the next outbound call not secure. (It is redundant if all outbound calls are not secure by default.)
